1
Blender
852 readers
1 users here now
Community to share art made in Blender. https://www.blender.org/
founded 4 years ago
MODERATORS
2
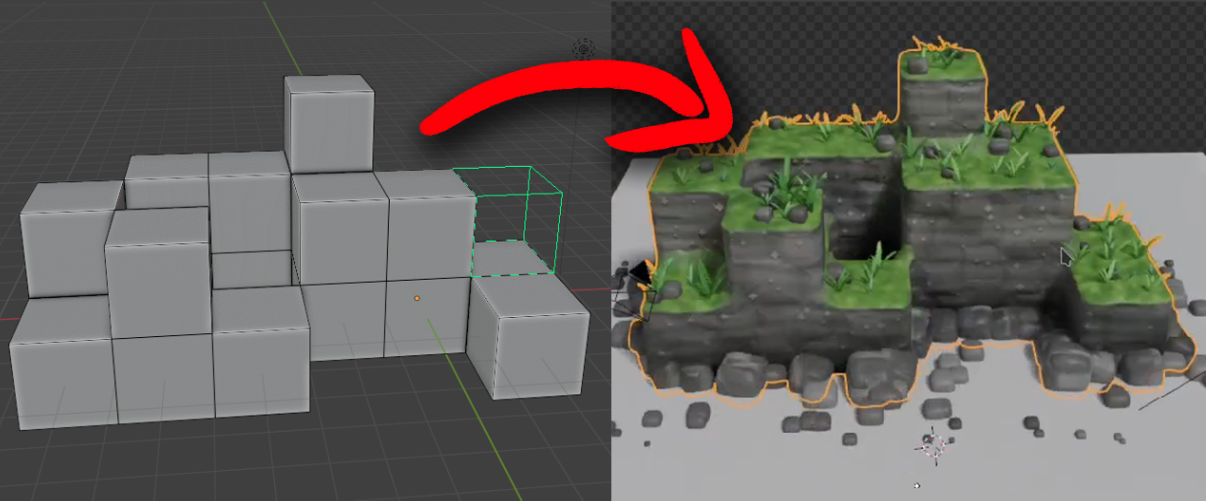
created a short video about the voxel editing prototype i posted some time ago
you can watch the video on peertube: https://peertube.wtf/w/3mXQaML35SQYzCTQqGKB82
or on youtube: https://youtu.be/VegbAhiXn7I
link to the addon: https://github.com/Aradgus/VoxelEdit-Blender
i do not plan to do some big updates since it was only for learning some bpy stuff
@blender
#blender #blender3d #b3d #gamedev
3
4
5
6
So you want to learn Blender? Read this.
11 months ago, I posted this: I wanted to get into 3D-printing, so I figured I'd dust off my old CAD modeling skills and learn Blender as well, because while they're not the same, the two are somewhat related, and both are useful for 3D-printing. And I always wanted to get into Blender anyway, because I always felt this is a tool I should know and add to my belt.
So I taught myself FreeCAD. That was easy, I knew CAD before. But of course, like everything that looks easy, it took me months to get really good at it 🙂
And with the models I made in FreeCAD, I taught myself 3D-printing. That also took a good long while. And crucially, the need to get better at 3D-printing is what drove me to get better at FreeCAD, because to get the models I wanted to print, I needed to know how to model them.
And then I hit a roadblock: I needed to make a really complex model in FreeCAD - a special shoe if you're wondering - and I couldn't. I mean I could, but it was exceedingly painful and it ended up looking very edgy and blocky, because FreeCAD isn't all that great at letting you control complex lofts.
SolidWorks could have done it much better, but I want to stick with FOSS software and FreeCAD just won't cut this one. I did learn a lot more about FreeCAD trying to model the shoe mind you, so it wasn't for nothing. But ultimately I was unhappy with the FreeCAD shoe.
I knew there was only one tool that could do what I wanted: Blender.
So I took the plunge.
And it was hard!
So the shoe was my first Blender model. Not exactly an easy tutorial... But here's the clincher: I needed it.
11 months ago when I started learning FreeCAD, I tried learning Blender alongside it and I went nowhere. I tried following tutorials, got bored stiff and gave up. I tried modeling something on my desk and I gave up because I'm not interested in pencils or scotch tape dispensers. Very quickly, I concentrated on FreeCAD - which did what I needed to do - and gave up on Blender altogether.
But here, I need those special shoes. I'm interested in 3D-printing them, it's a fun project and Blender is the tool I really need. Just like getting better at 3D-printing drove me to get better at FreeCAD, the need to print this shoe drove me to get better at Blender.
In short, you need a purpose! You won't learn something with as steep a learning curve as Blender without a purpose.
Am I good at it? No.
Am I fast? Hell no.
Do I know it well? Not a tenth of one percent of it.
But here's the thing: I'm good enough with Blender that I now naturally turn to it for certain jobs. For instance, I needed to illustrate something for someone yesterday and I automatically reached for Blender. And while I was modeling what I wanted to illustrate, I automatically reached for the right tools and used the right methodology.
That's the mark of a tool you've internalized: Blender is now part of my toolbelt, and that's what I wanted all along.
So as a newly-minted Blenderer, here's my advice if you want to learn it:
-
Find a purpose. A real purpose! Don't make it up. Whether it's learning something for your job or moving forward in your pet project, you need Blender to serve a true need you have.
If you don't truly need it, you won't keep at it and get over the steep beginning of the learning curve. Without a real purpose, my advice is, don't even bother.
-
Forget all tutorials but one: the donut tutorial part 1 and 2.
The problem with tutorials is, they pretty much all assume you know some Blender, or they're too fast, or they're just not very good from an educational point of view. The donut tutorial is VERY good and it starts you from absolute zero slowly and correctly.
Once you know how to drive blender, you'll be able to get useful information out the other parts of the donut tutorial if you want, or other tutorials even if they're not great. But for the love of all that's holy, use the beginning of the donut tutorial to get going.
-
Forget keyboard shortcuts.
Honestly, this must be the singlemost common mistake in most tutorials. They all tell you "type Ctrl-this, Shift-Alt-that. Numpad-something" and the shortcuts all do something the tutorial wants you to do, but they totally fail to show you why you should be doing this.
Force yourself to use the menus: just by hunting for the things you want in the menus, you'll organically grasp the structure of the menus, why the thing you need is there and not somewhere else, and you'll get a much deeper understanding of how this whole thing works.The shortcuts don't give you that insight.
Don't worry, you'll end up using the shortcuts too eventually, when you're tired of clicking the same sub-sub-submenu item for the millionth time. But you'll know what the shortcut cuts short, which is surprisingly important.
-
Check which version of Blender you use and dismiss tutorials or tips you find online that don't pertain to that version, or that are too old.
Blender evolves constantly, and most of what you'll find online don't really apply directly to newer versions anymore. You can waste a lot of time realizing that this menu item that someone is refering to doesn't exist anymore or has moved someplace else. It's silly really, but that's an easy trap to fall into.
-
Do the drudgery. Yes, sometimes it's a PITA to move thousands of invidual vertices or clean up faces manually. And more often than not, if you feel a need to do something in a smarter way, chances are someone else did too before you and there's a clever tool for that you'll probably find easily online. But when you do the drudgery, you build up muscle memory and reflexes. So at least at the beginning, don't shy away from low-level editing.
So that's my advice to get into Blender. It's not an easy tool to learn but it's an important one, and that's how I got into it. Hopefully you'll find my limited experience worth your while.

7
10
Hi
So, the thing I want to accomplish is to add .png images, compile them and then transform the compiled montrosity (move/scale, etc).
But the thing is, if I "alphaover" the images with some offset, for example:
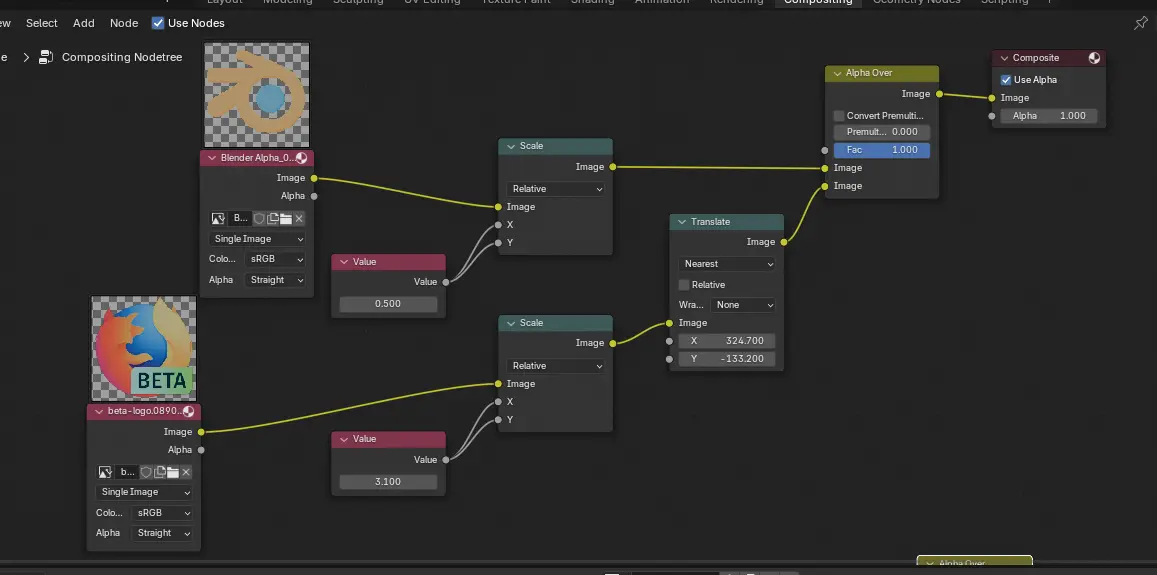
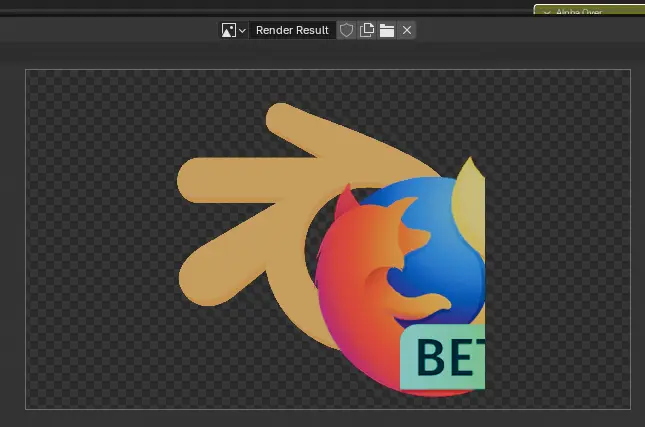
the image laid over the other cuts off, as the overlay can't reach outside the dimensions of the underlaying one.
I know I can just:
- use eg. gimp and combine the images there, but I'd rather have my workflow entirely in blender.
- add transparent padding for ~billion pixels around the decal as a workaround, but that sounds silly and "bruteforcing" the concept.
How would I go about getting all overlaid images to display in full in such case? I've tried different options on the "alpha over" and "color mix" -nodes without results, but entirely possible that I just missed some critical combination.
So, thoughts?
11
1
Help: Bending an arc while increasing size and angle, with even proportions and smooth curves
(lemmy.world)
This may be the wrong place because it's for Blender art itself.. if so, please remove.
I have an arc. Lets say it's something like the image attached to this post.
How would I bend the tip of one end so the rest of the shape stays uniform and bends evenly / organically? I'm trying to have it keep fairly even proportions and smooth curves.
I've tried a few tutorials on bending, rotating, and they always end up with turns along specific vertices, giving a sharp turn or a stretched effect. "Skew" may be the right term I'm looking for.

12
1
Procedural screw threads using geometry nodes (free download, feedback welcome !)
(blog.guillaumematheron.fr)
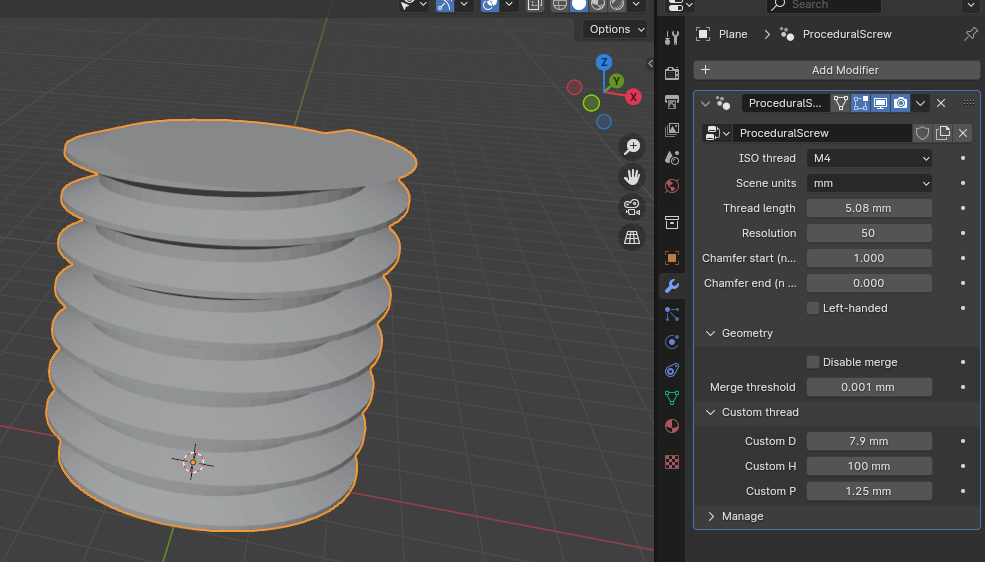
I couldn’t find any good examples of threads generated with geometry nodes, so I made my own following the ISO metric screw thread specifications.
13
cross-posted from: https://sh.itjust.works/post/18900173
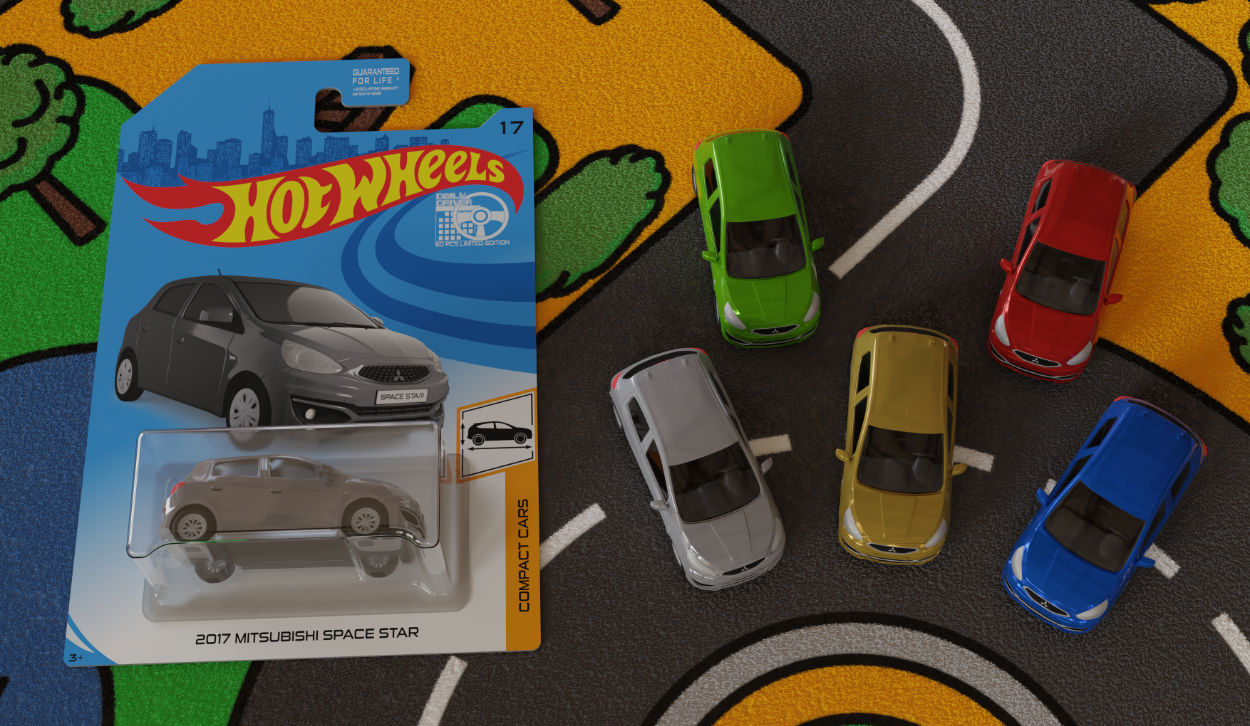
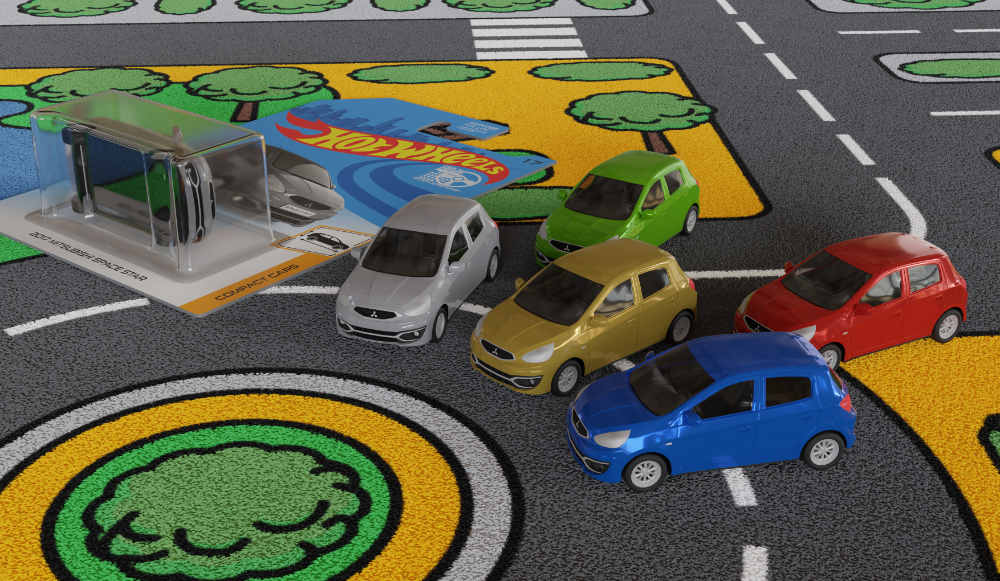
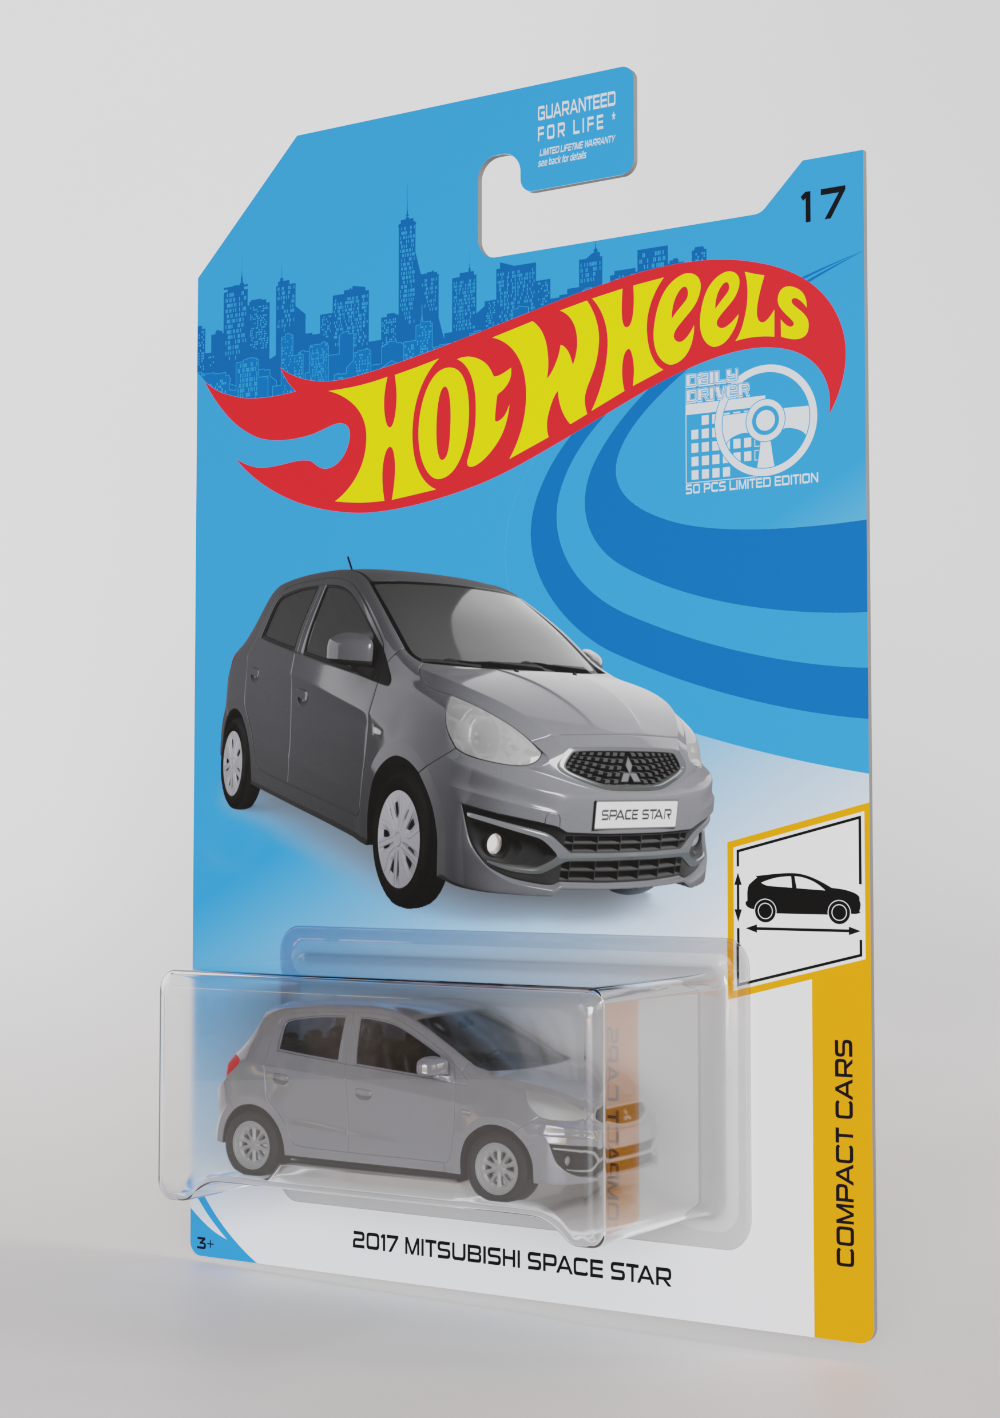
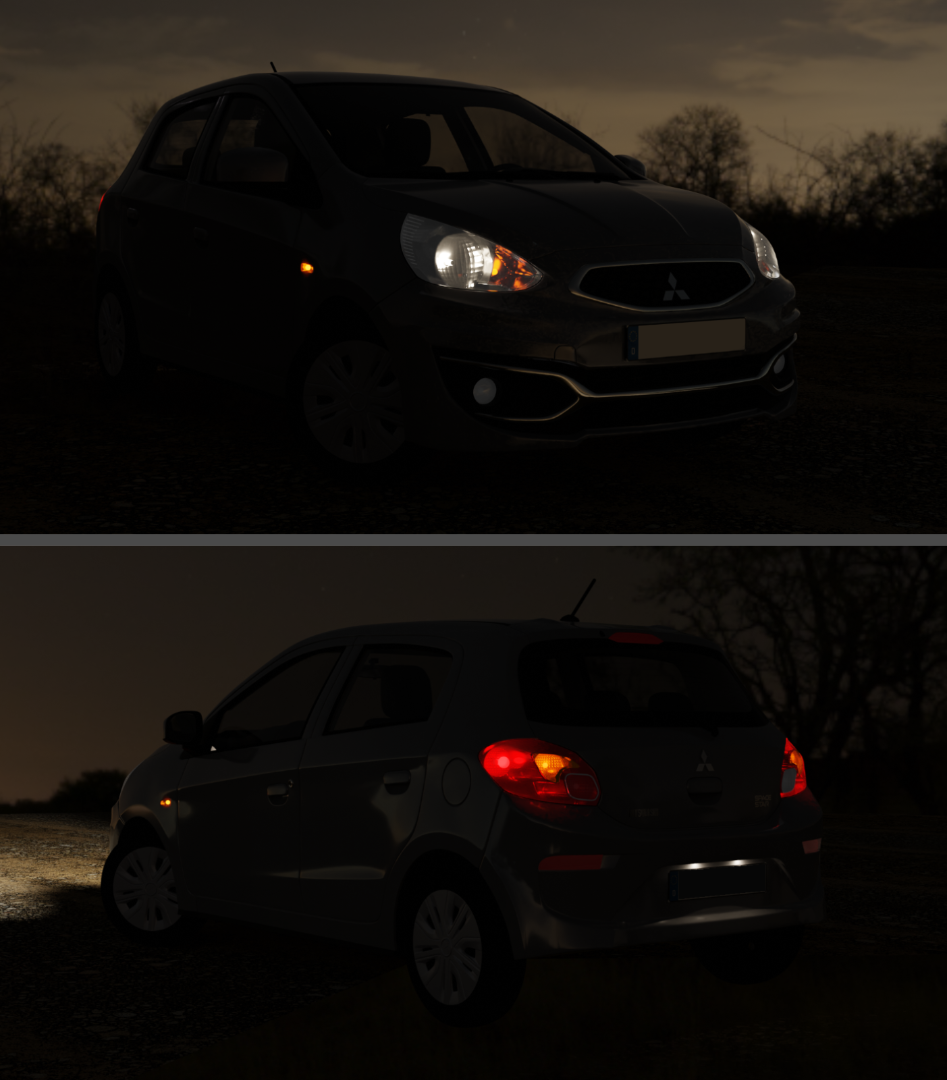
In addition to my last post I want to share another work with you all. I created a toy car from my exsisting model and I also made a packing for it in the style of a Hotwheels toy car packing as if they would have made it.
For the general shape of the cardboard I found a template on the internet. Apparently I wasn’t the first one that came up with the Idea of creating a toy car version of a casual vehicle. This template saved a lot of time in guessing the correct measurements and proportions.
The rendering of the car on the packing was rendered with EVEE since it must not be too realistic. The cars depicted on these real packings are detailed, but look more like a colored illustration, also there are no enviromental reflections. The glass (windshield) is opaque. I added the „Space Star“ writing to the number plate, which usually would be on the trunk door. Without the number plate the picture of the car would be somewhat empy, although the depictions of cars from genuine Hotwheels packings don’t show number plates since these are mostly racing cars - or at least not boring everyday cars.
With EVEE I was able to render the scene without any background because the rendering was put onto the cardboard design which I created in Affinity Designer entirely.
For the bilster packing I used the subdivison surface modifier for smoothness and the solidify modifier to add a little bit of thickness.
To make my car model appear like a toy car I had to apply some changes to it. The most noticeable one is the tires. I found out that toy cars only have a few basic tire designs which are shared between all kinds of cras. I made another set of tires with the help of the array modifier. Additionally to that I made the tires way wider than they would be in real life. The original car model has raher thin tires.
Another thing I did was to remove all additional things like the decals, the windshield wipers the number plates and the antenna. Also I changed the material of many plastic parts (e.g. the mirrors) to the color of the paint. Usually the scale of these toy cars is 1:64. That means the length of the car is about 6 cm or 2.36 Inches. There are not many details visible.
I changed the material properties as well. The head and taillights of reals toy models seem to be painted on, so I scaled down the transmission value and scaled up the roughness value for these materials.I changed the chrome material to a less reflective one as well.
For the composition of the packing and the unpacked toy cars I choosed a road area rug. I guess many of you had one of these - at least I had one. For the fluffiness effect I used hair particles. Since it was not possible to find a good picture on the internet I was forced to re-draw the carpet using a blurry picture as a template. I did that in Affinity Designer. Then I used that drawing as an image texture. The carpet has 8 million hairs (at 10 million my laptop crashes) and working with that many particles was a pain in the ass. I saw the spinning beach ball a lot. Maybe that is the one of the reasons why desktop computers still have a place.
For all renderings I used Cycles.
I didn’t track time so I don’t know how long all of this took me. What I can say is that the drawing of the carpet took me about 9 hours, and the setup with the hair particles took almost all weekend.
14
cross-posted from: https://sh.itjust.works/post/17781622
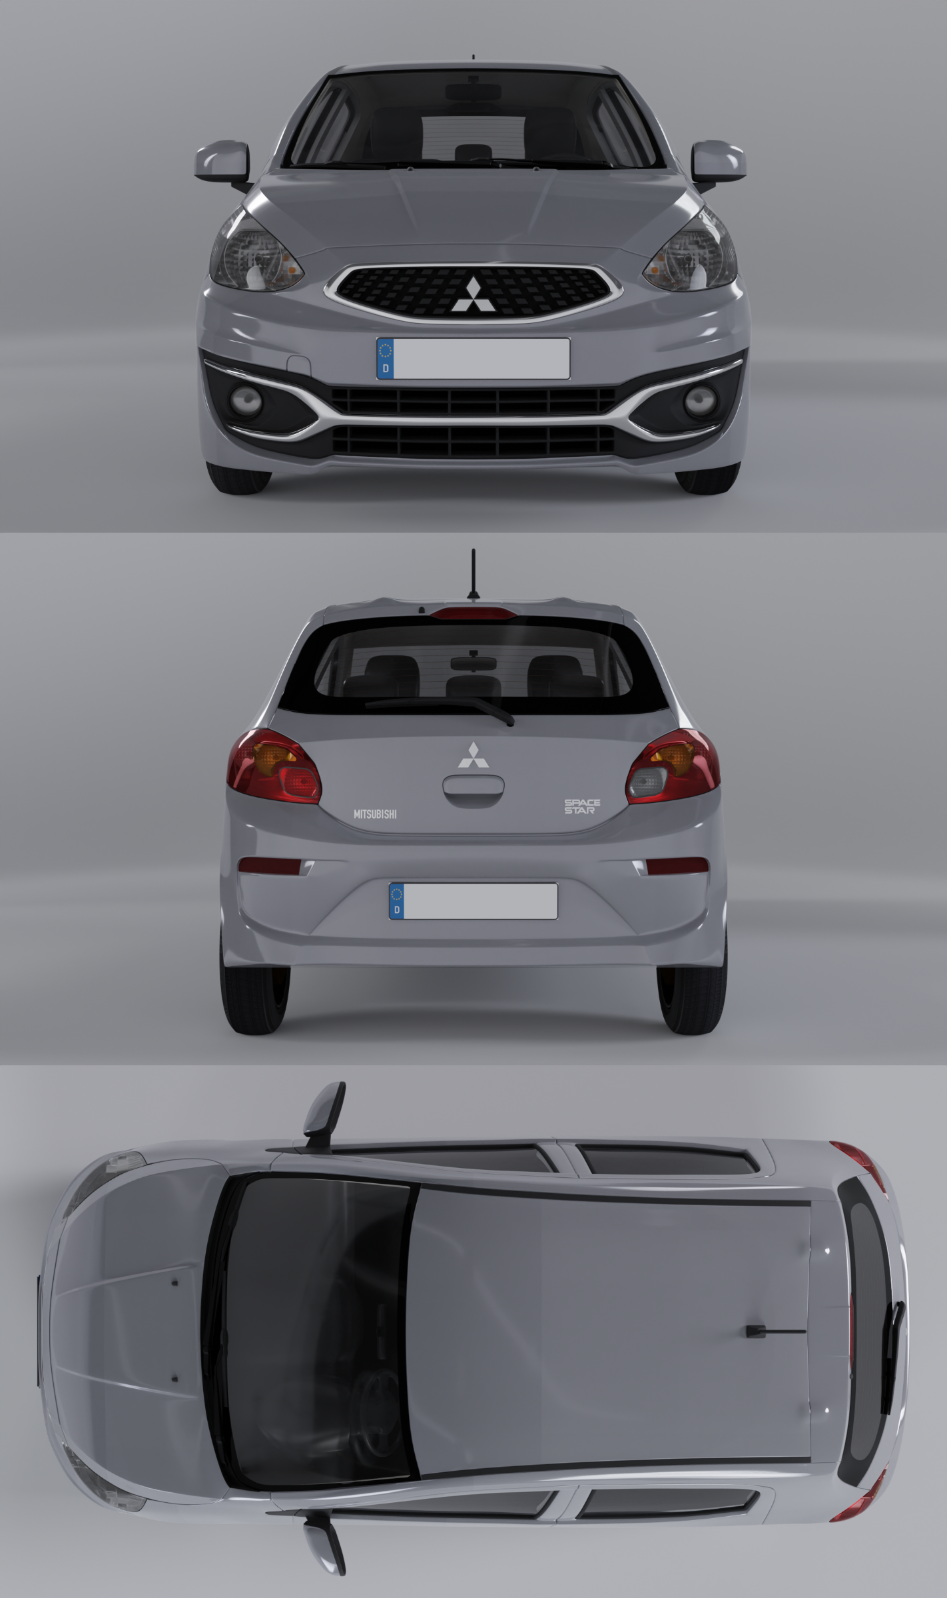
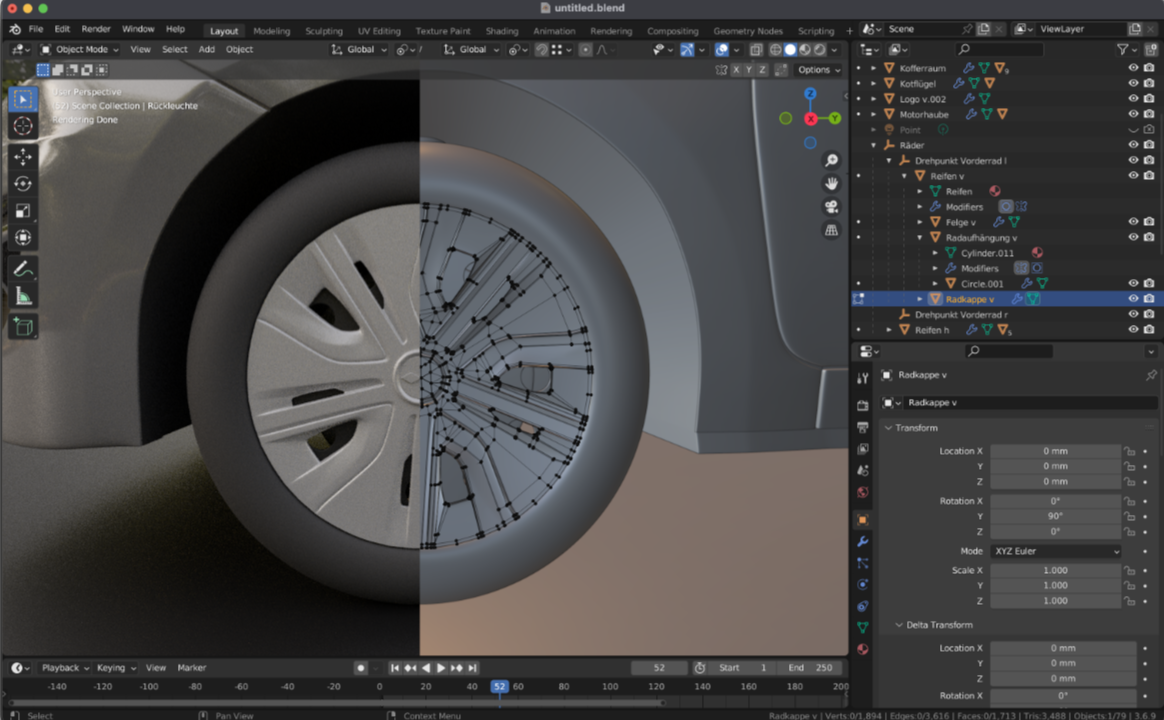
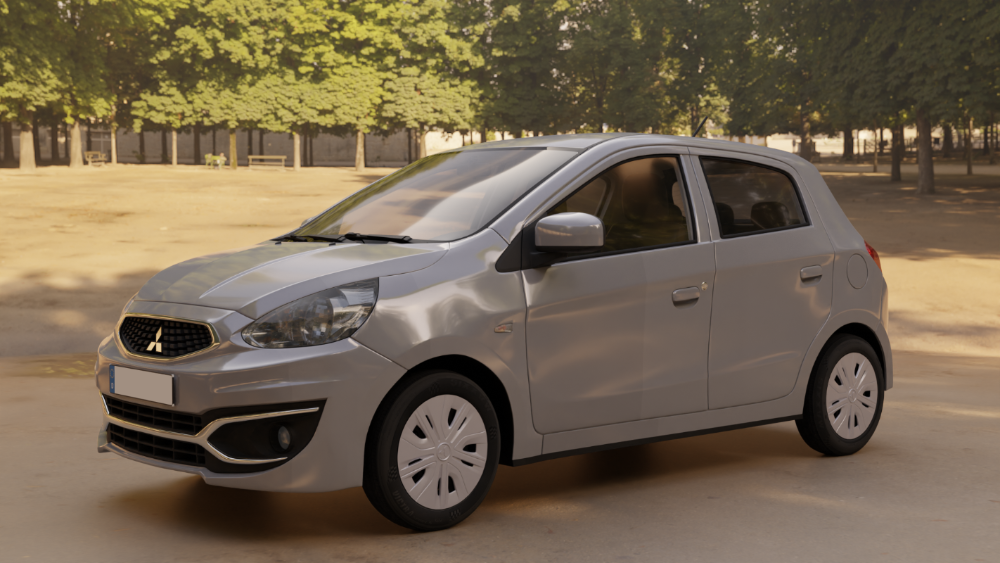
This is my latest work - a Mitsubishi Space Star (also marketed as Mitsubishi Mirage) modelled in Version 3.6.9.
It took me approximately 180 hours which spread over the course of 6 weeks (Blender, modelling only) as well as an additional 8 hours for tracing the side, front, back and top view (using Affinity Designer) which I used as reference images to create the general shape.
All details were built with eye measure from photos.
Most of the car is symmetrical, which means that only one half had to be built. I used the mirror modifier for almost everything as well as the subdivision modifier, shrinkwrap modifier (for the decals and the back lights) and array modifier (for the grille and for the heating lines in the back window, also for the wheel caps to an extent).
As mentioned above it took some hours to complete the work. One reason might be that the work process is much slower than anticipated, due to lack of knowing all the tricks and features.
My question to you is: Do you also spend so much time creating your work with Blender?
The result (for the upload I removed the number plates):

15
16
17
18
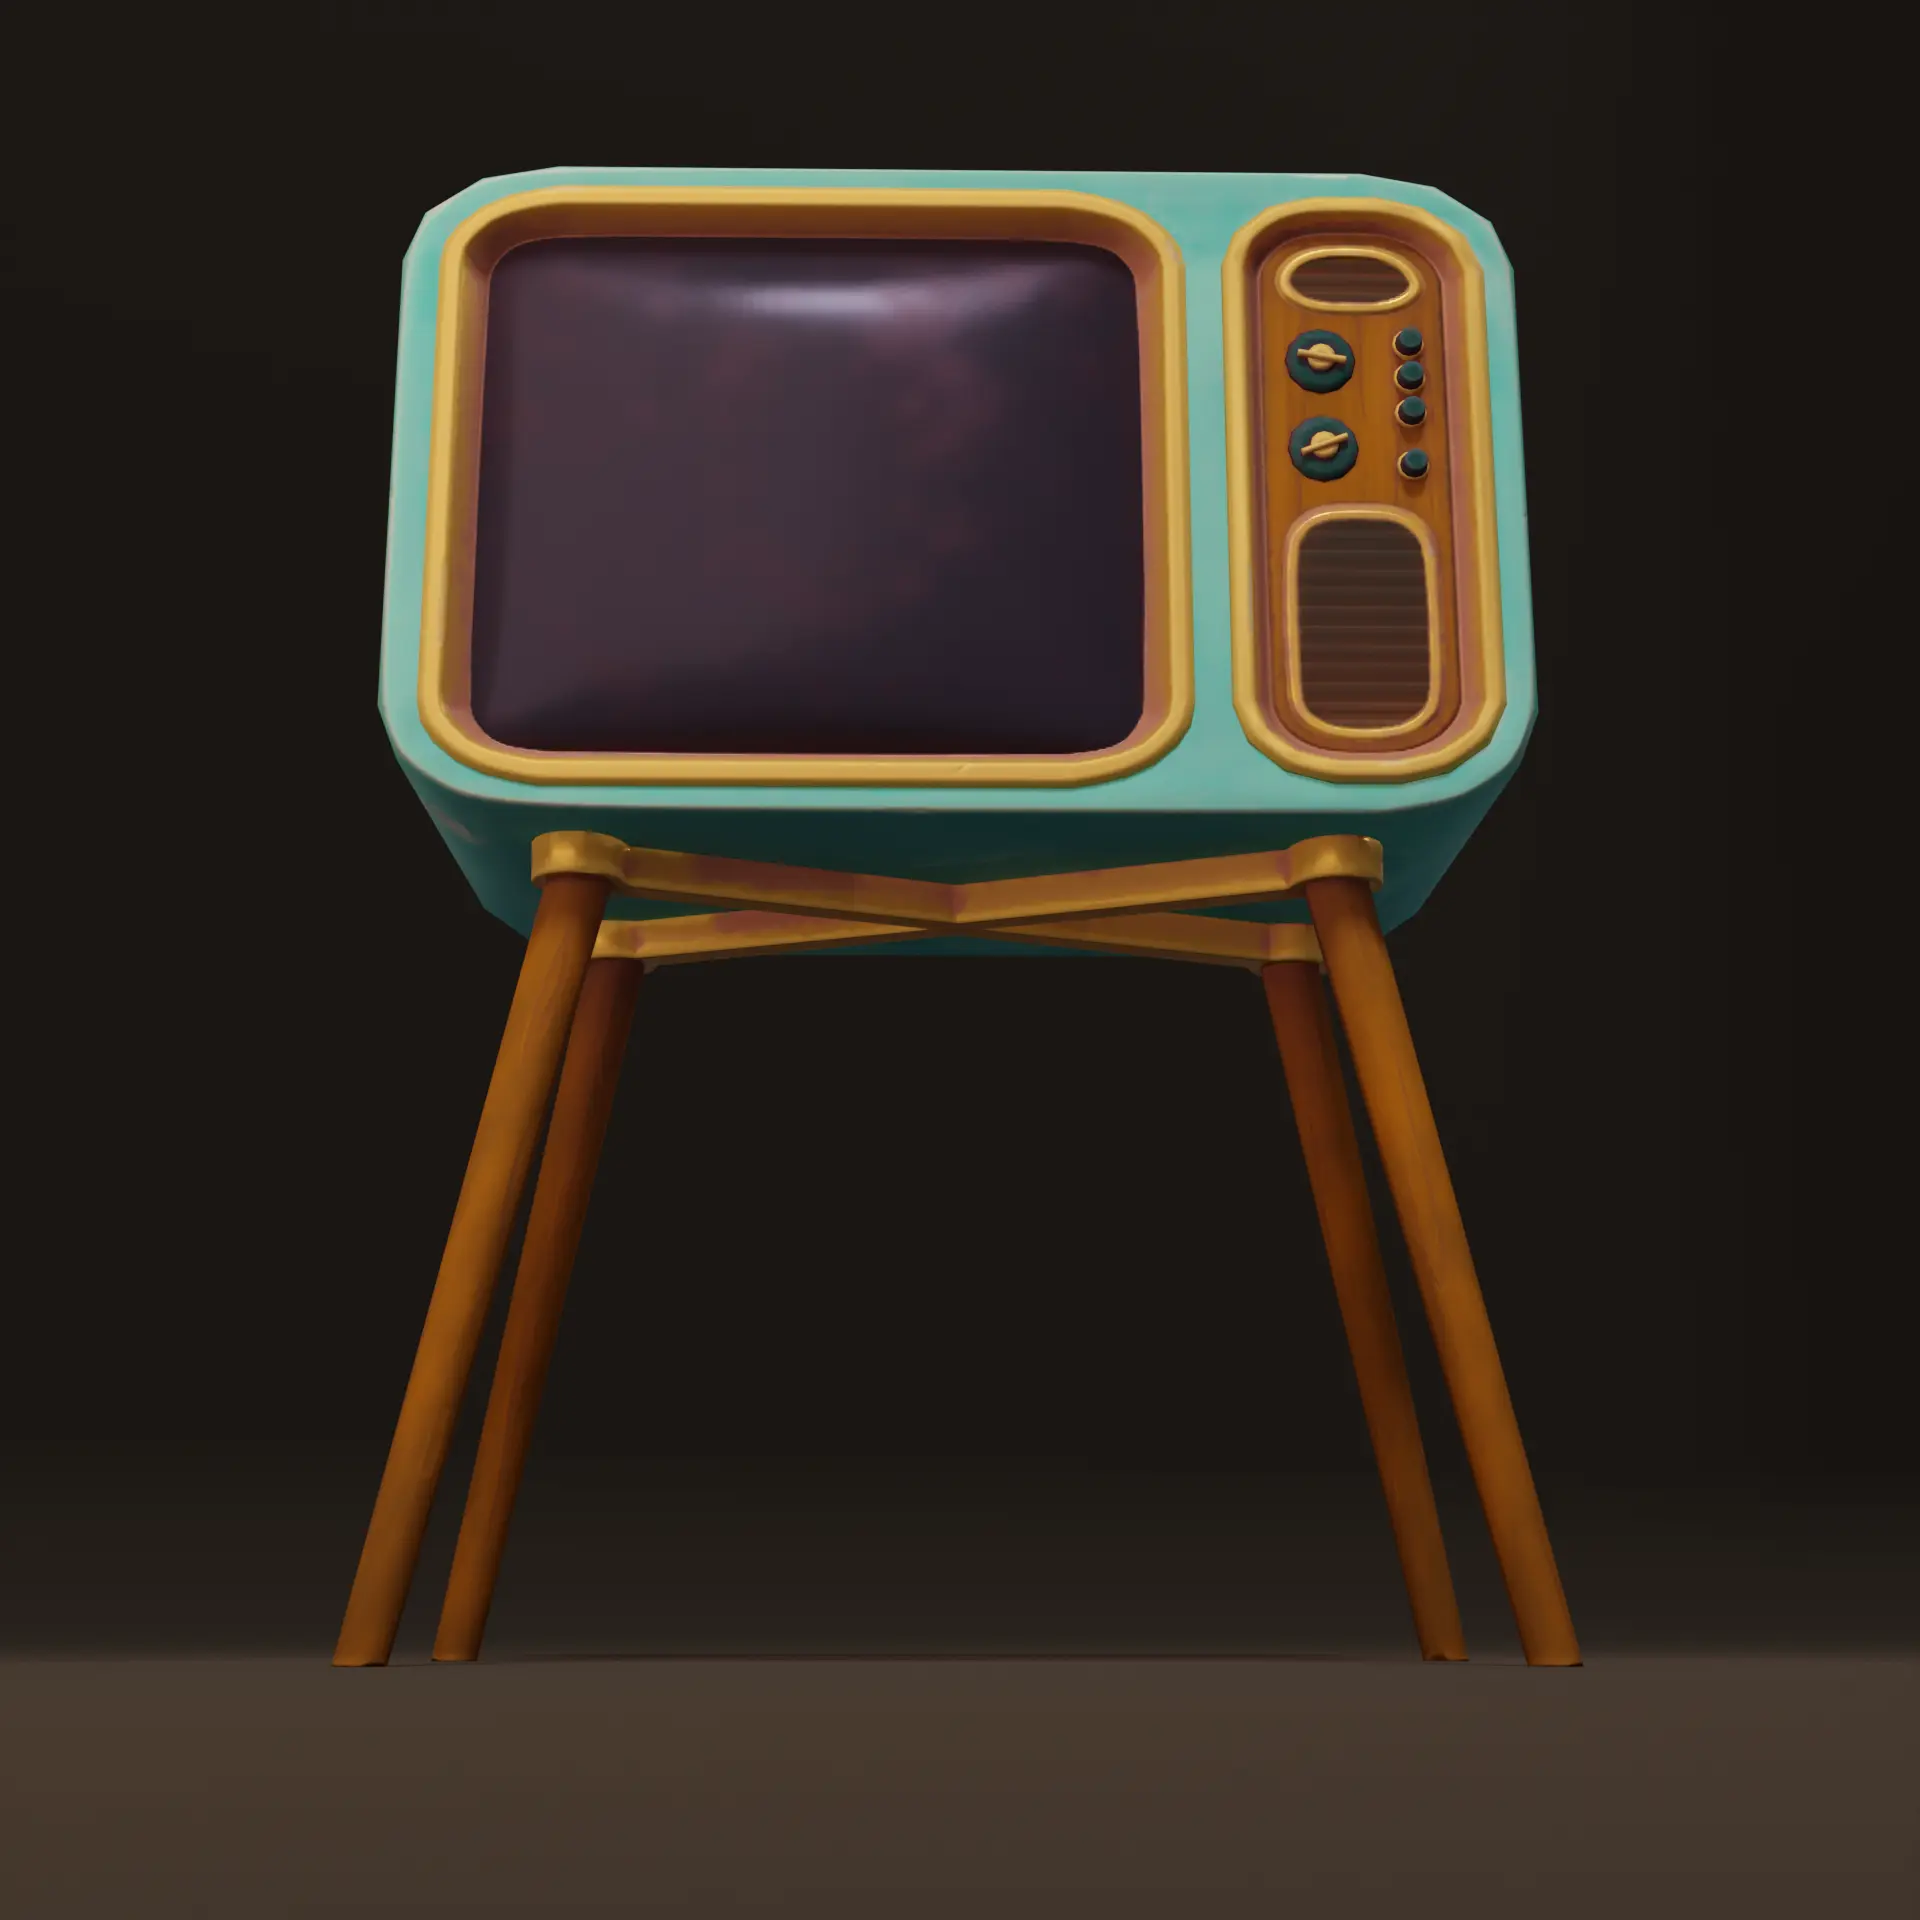
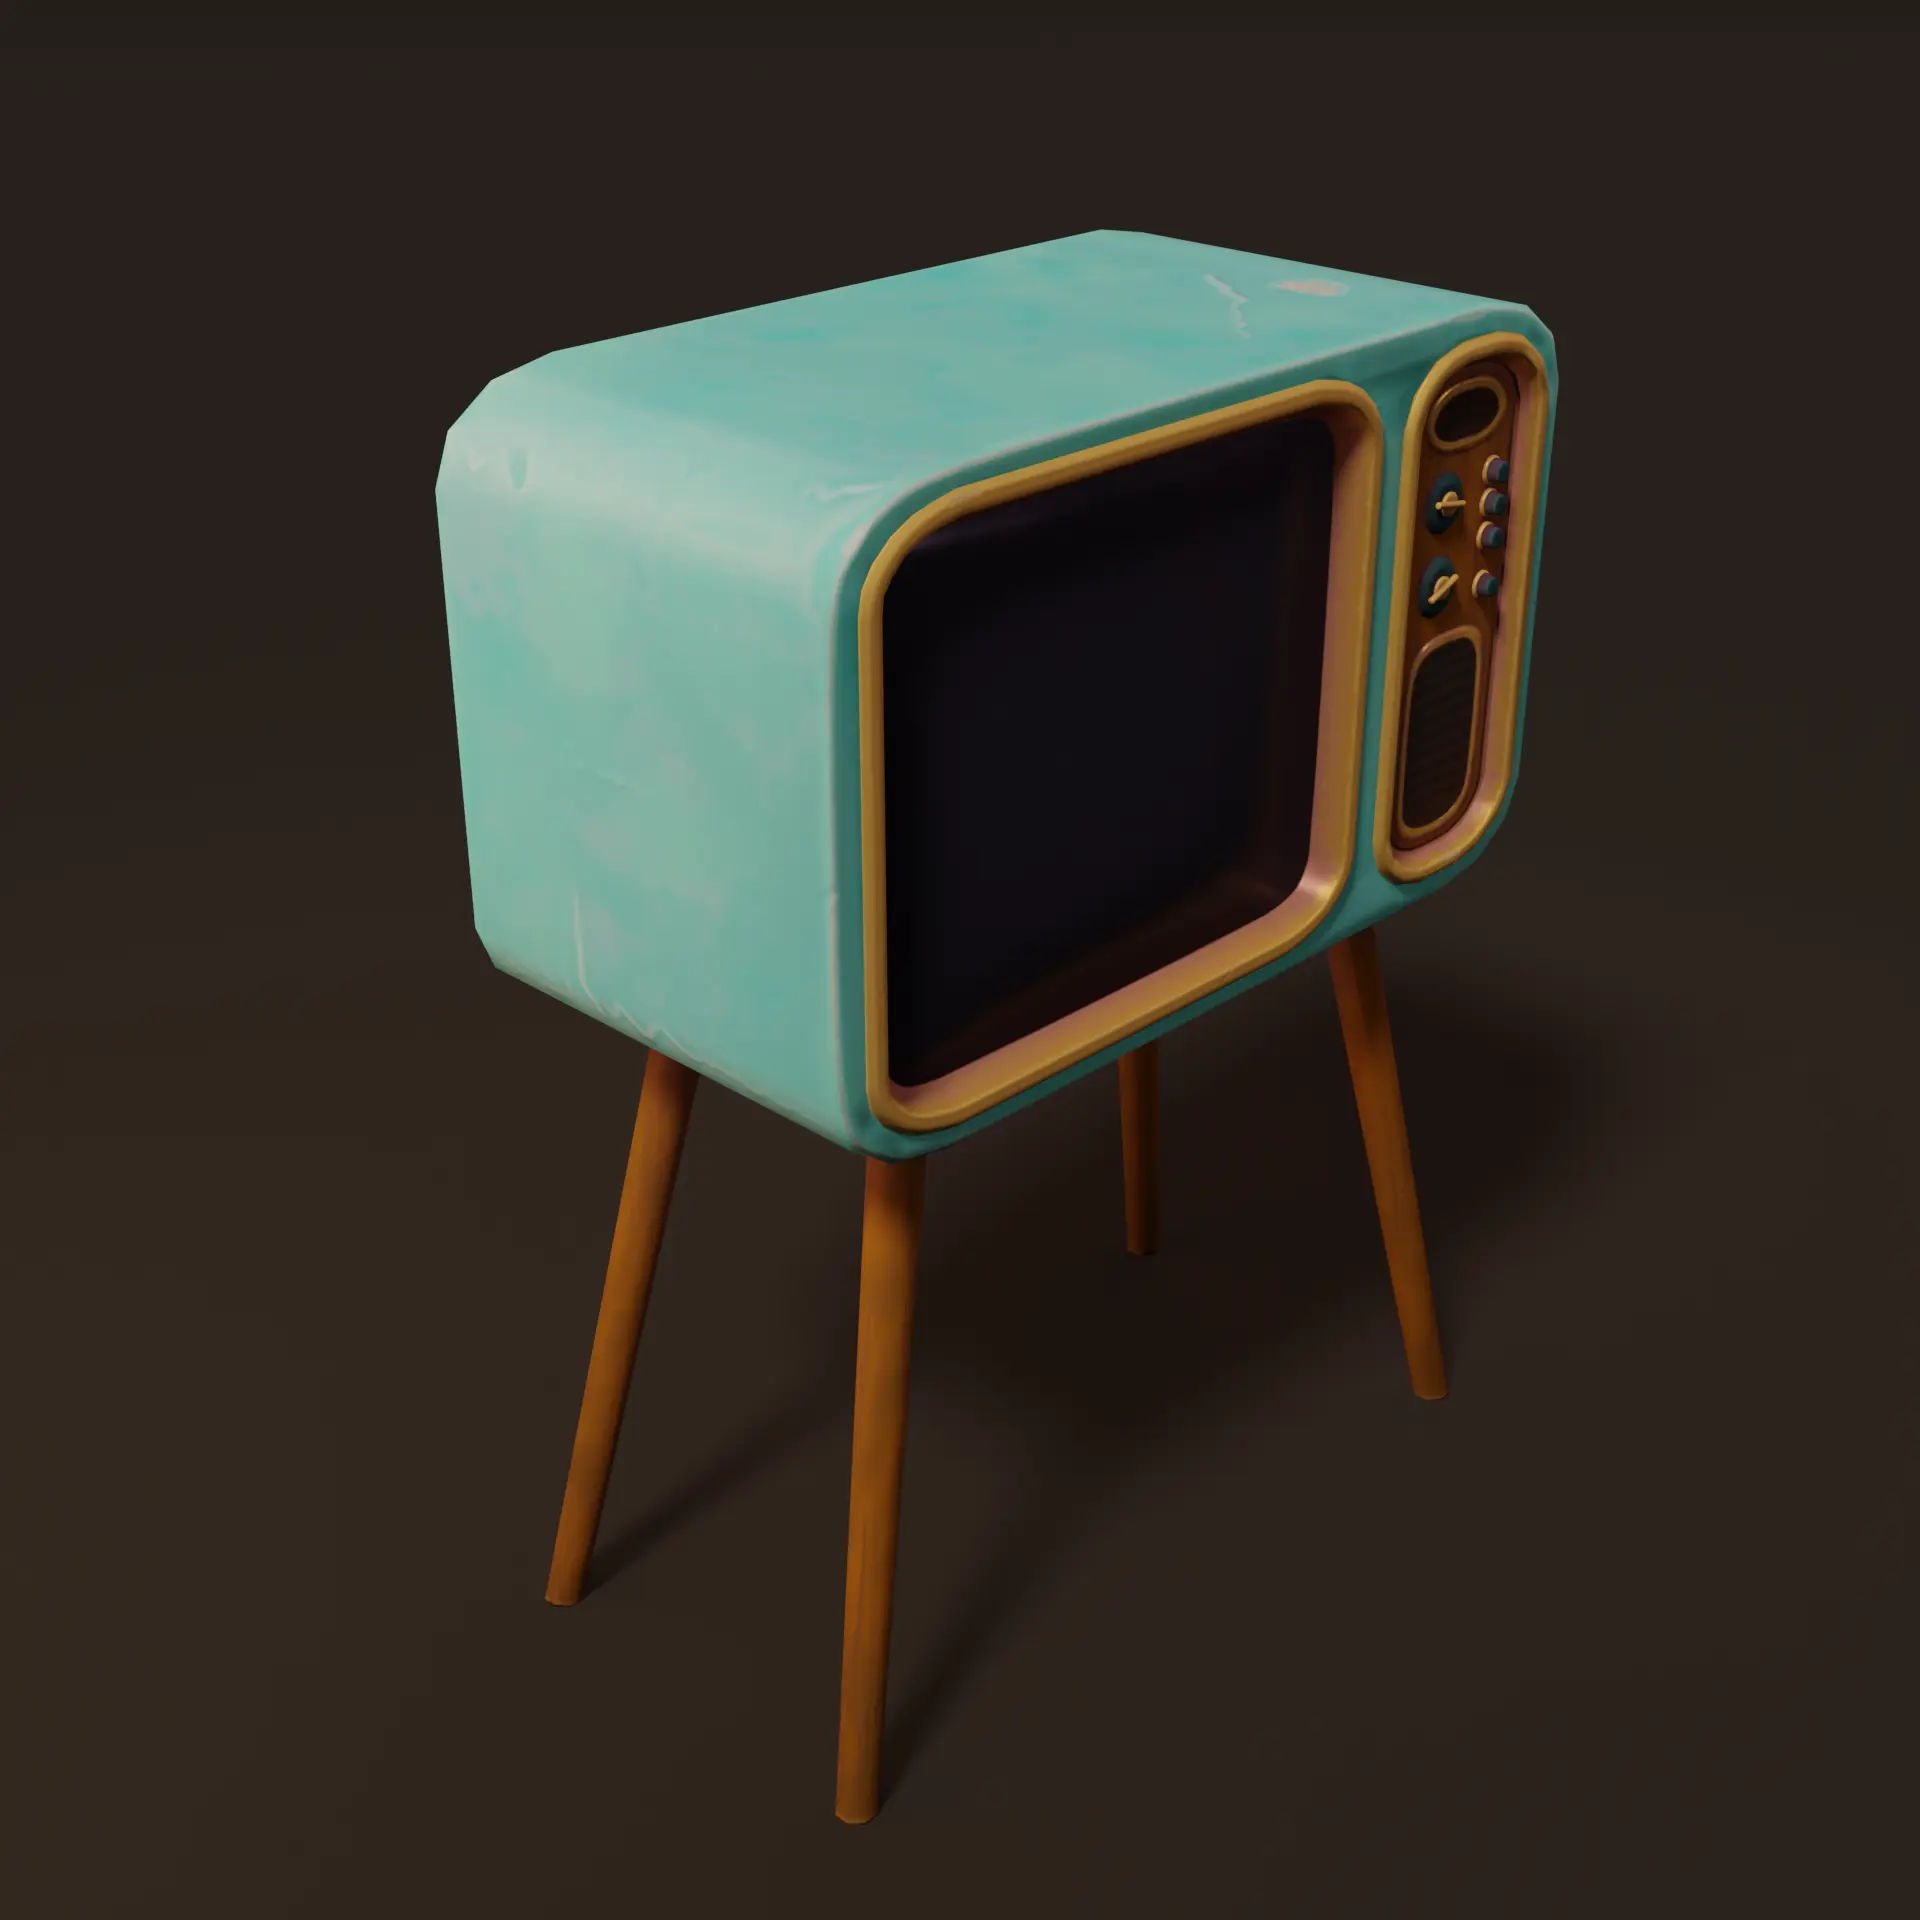
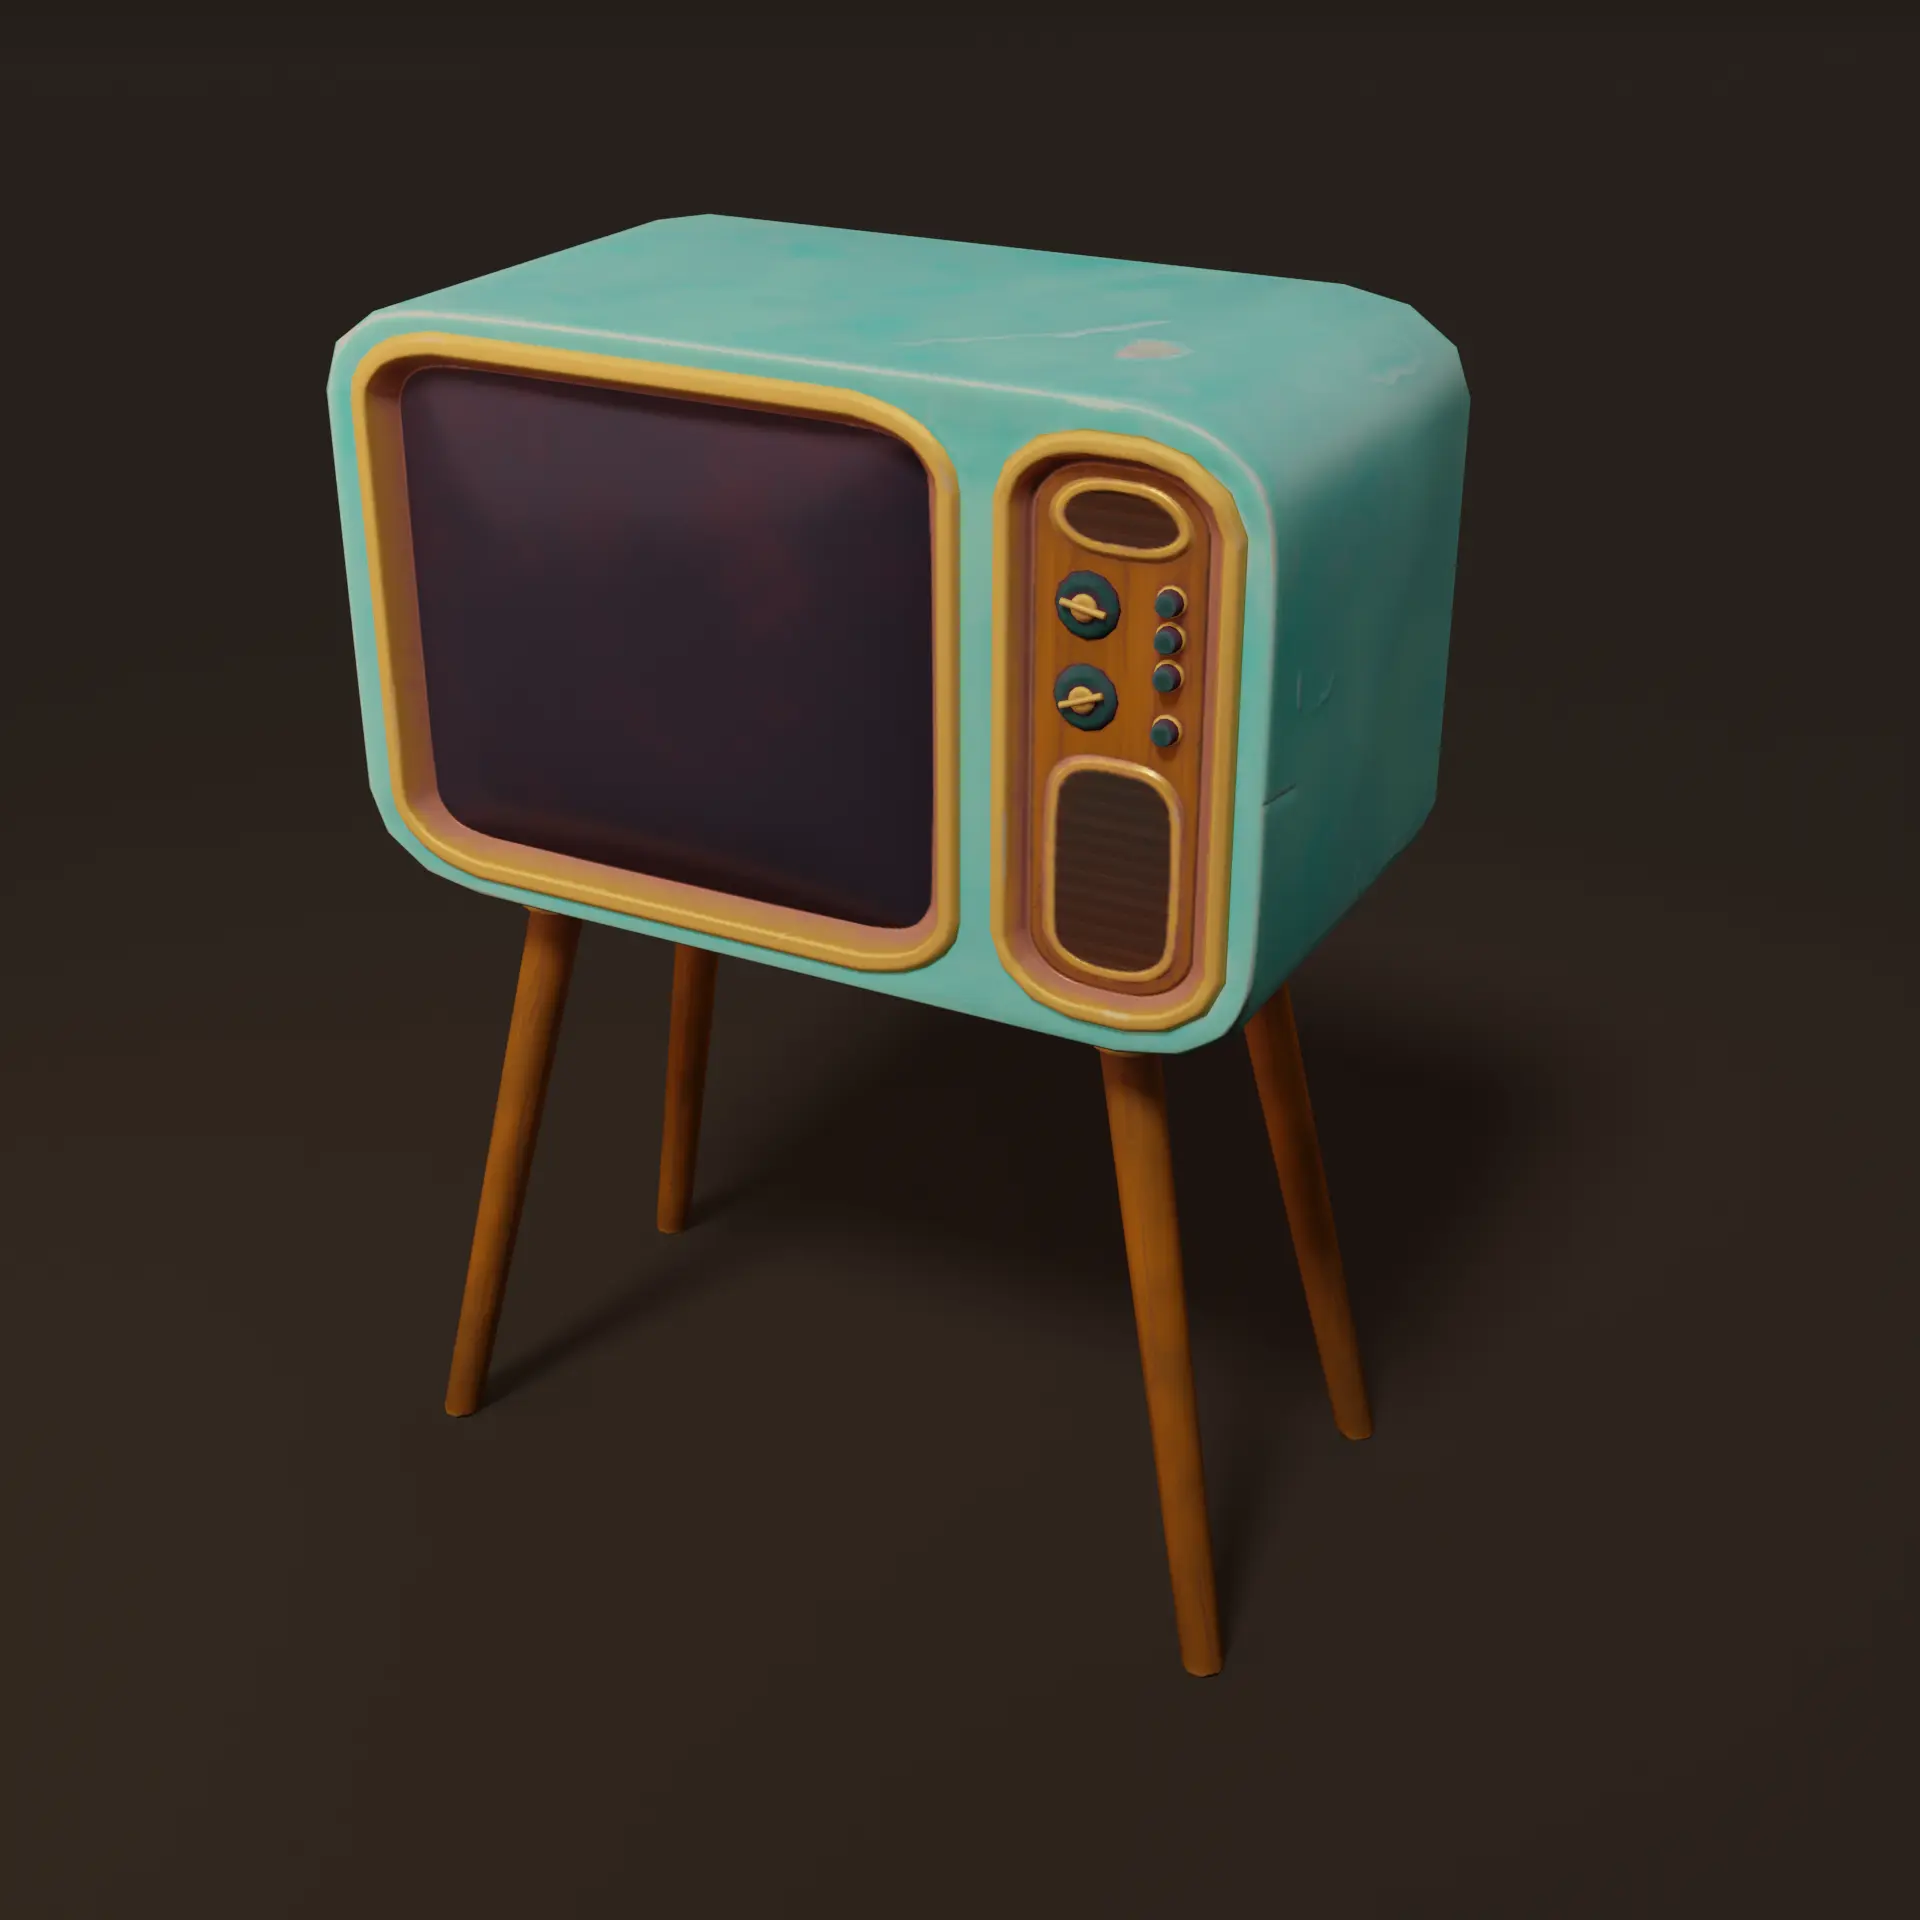
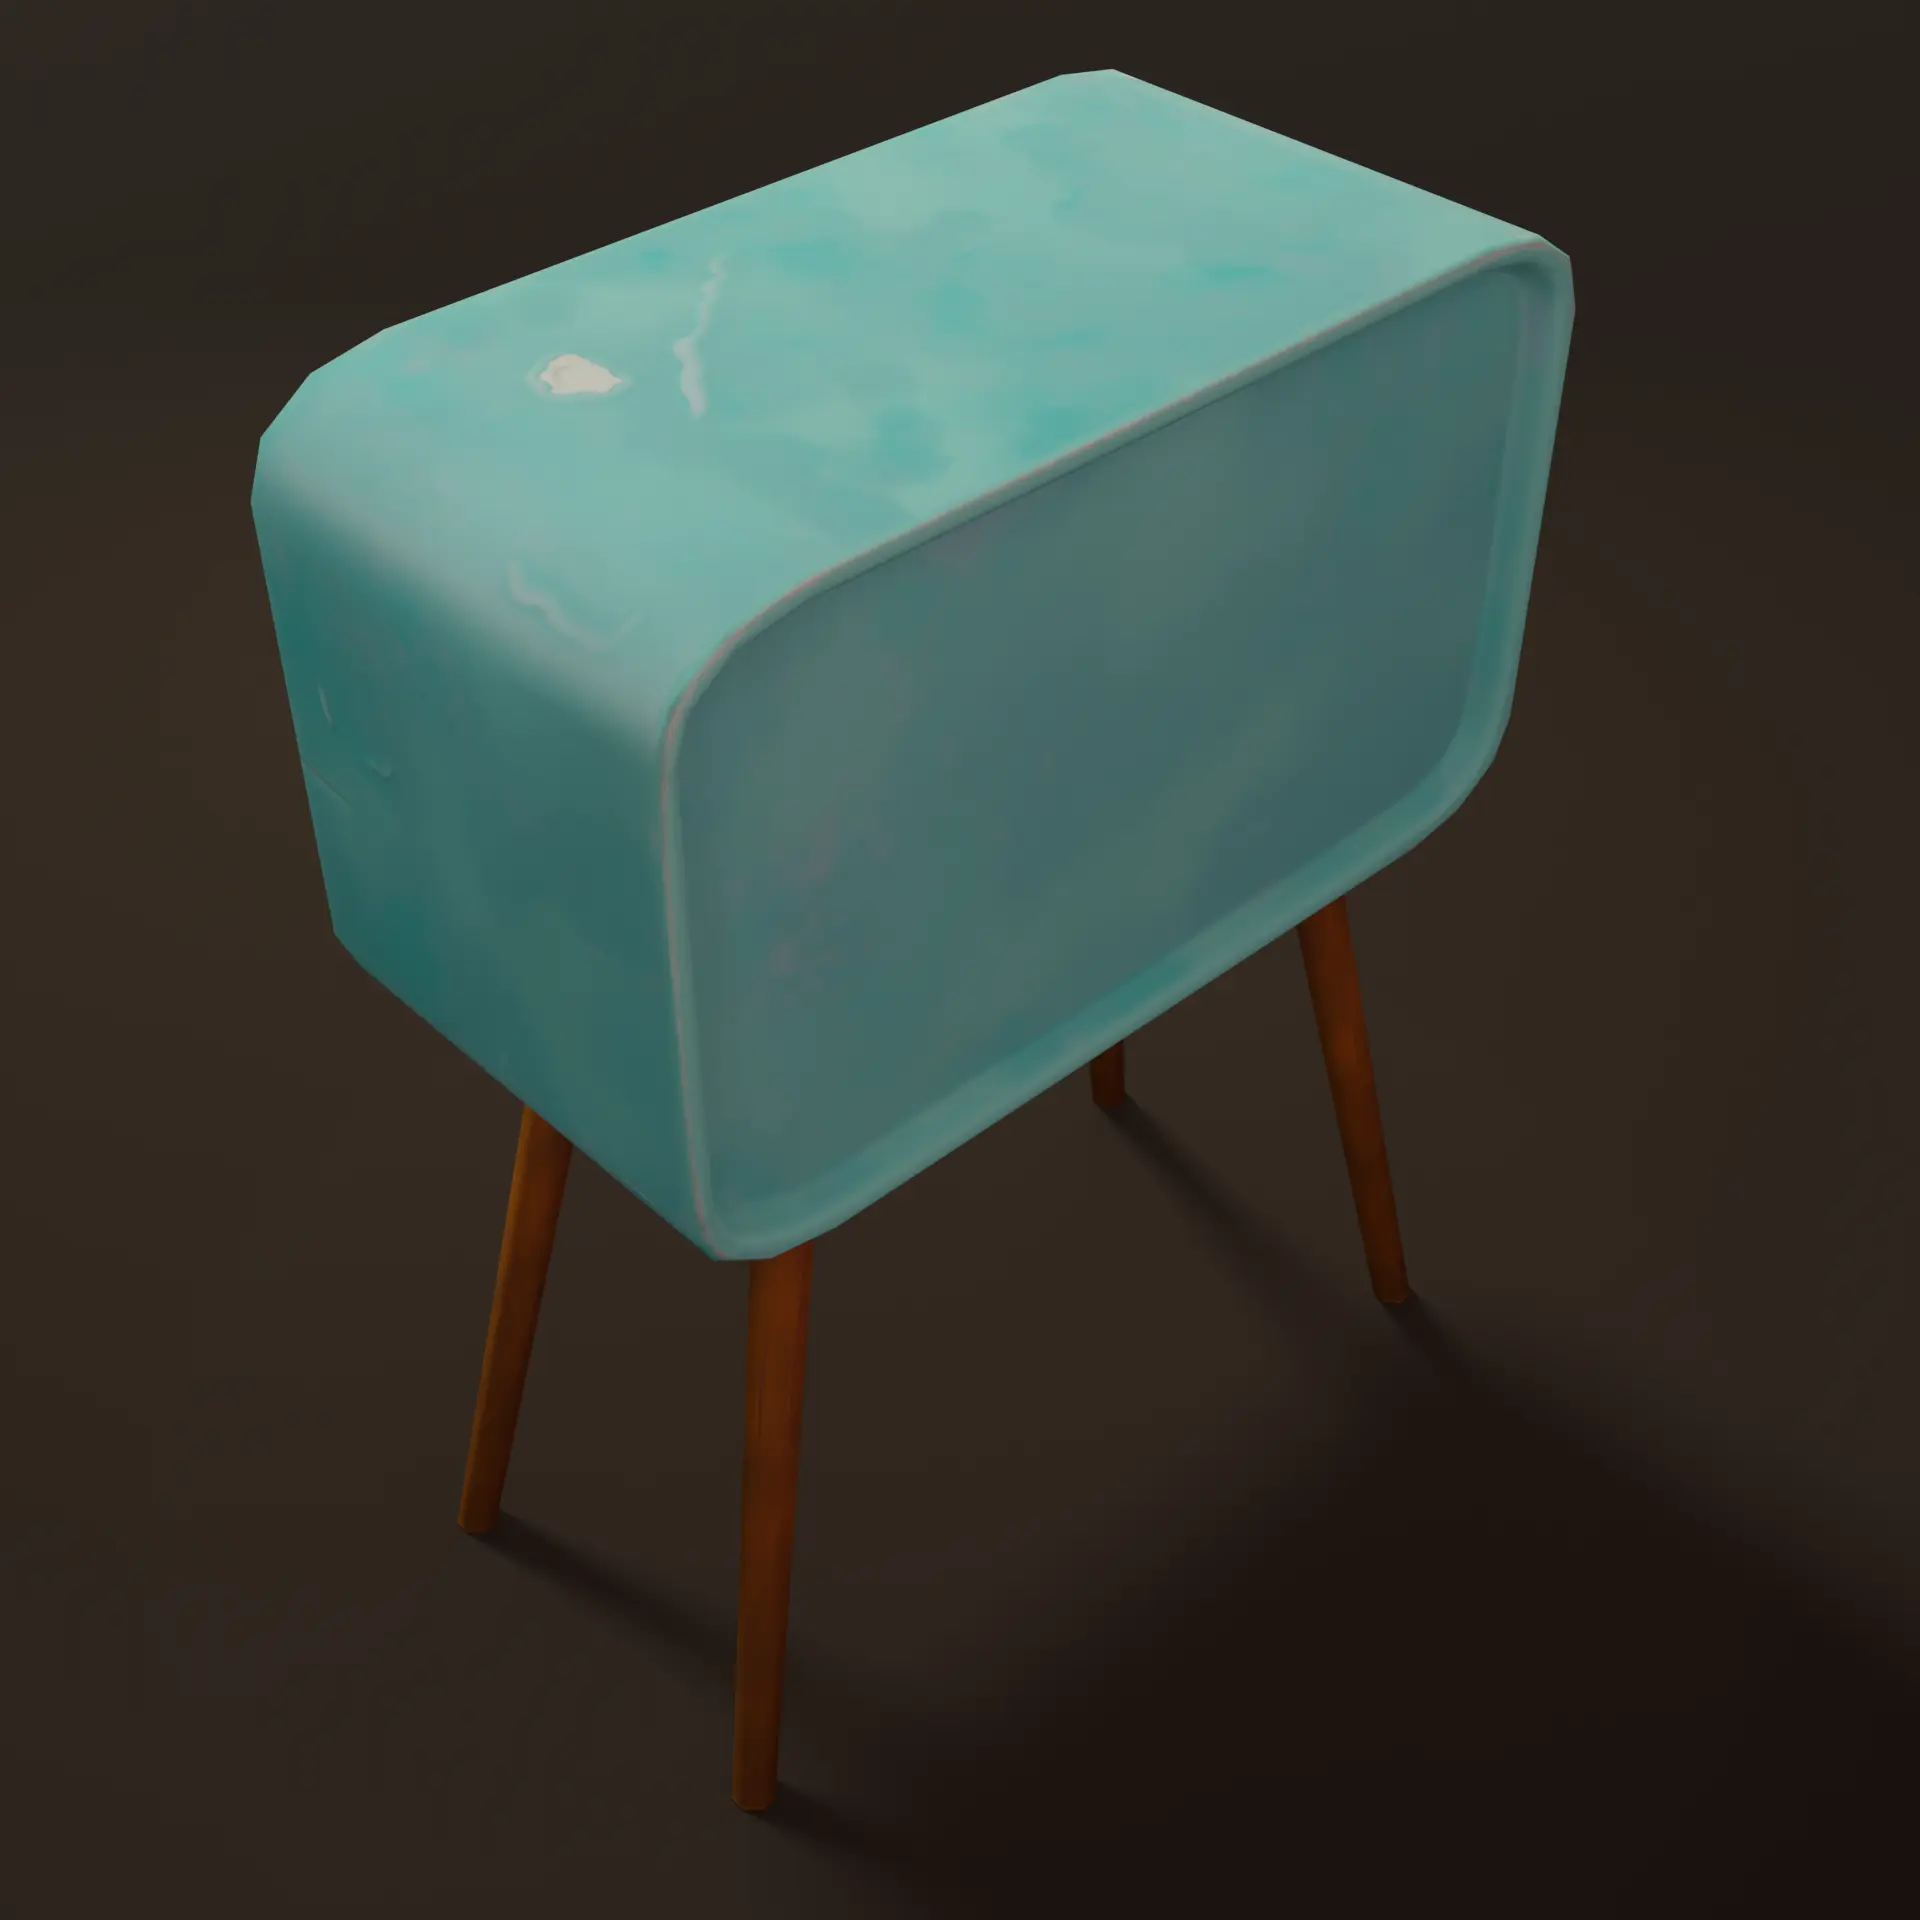
After a long break, I returned to 3D and made this TV for a game that my husband and I are making.
Textures 1024*1024
Vertices 1346
Triangles 2294

19
20
cross-posted from: https://lemmy.ml/post/10222248
I recently switched from Windows to Manjaro because i tied it for some time on my laptop and really liked it.
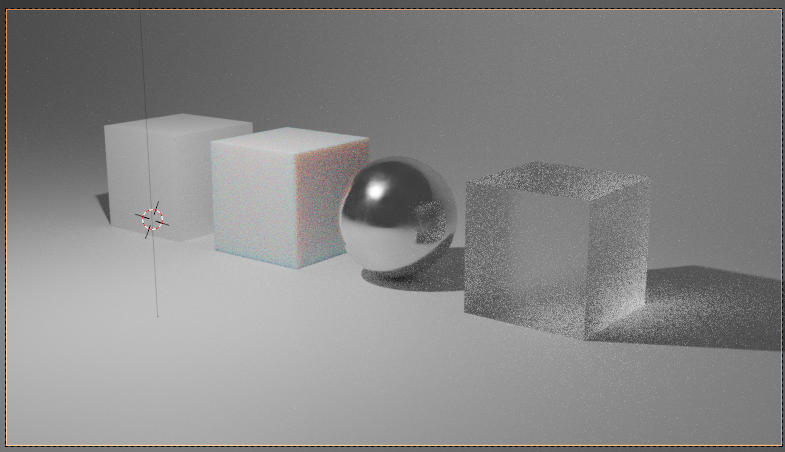
But now I have major problems with blender 4.0 Cycles HIP rendering on my PC. I tried amdgpu-pro-oglp, hip-runtime-amd and hip-runtime-amd-blender but i get strange shading with progl blender and hip-runtime-amd-blender, with hip-runtime-amd blender crashes when selecting gpu rendering. I use a "radeon 5600 xt" GPU and everything worked fine on Windows, but i really don't want to go back to Windows
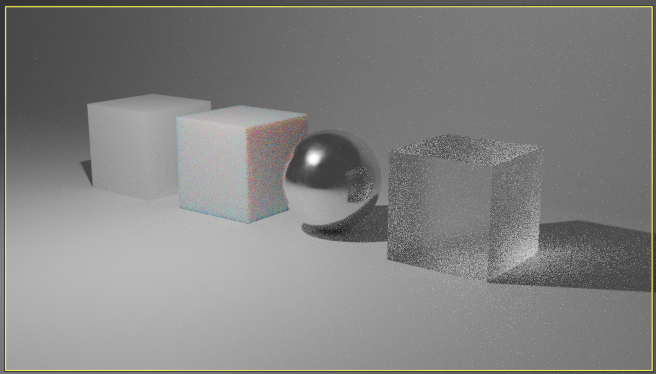
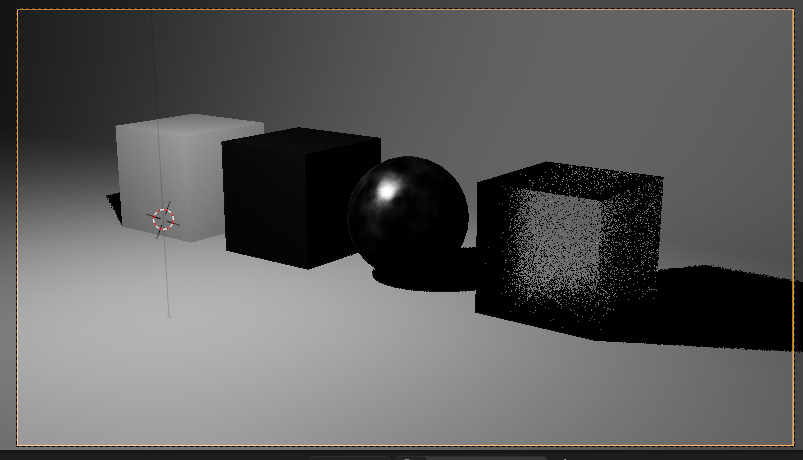
Everything works fine in blender 3.6 LTS I created a simple scene to show the problems on the left is simple principled bsdf, middle left is principled bsdf with full SSS the sphere is metallic and the cube on the right is glas:
- Blender 3.6 (GPU HIP, works fine thats how it should look)
- Blender 4.0 CPU rendering (works fine)
- Blender 4.0 GPU (HIP, not working, sometimes crashing)
Pls help its pretty important for me that newer versions of blender work. If you need more information just ask.

24
1

25
Quite a lot of hurdles with this (couldnt really fix the wrinkly mouth sadly) lowpoly zelda but she is done!

view more: next ›